
The Smart Electric Fence Grid
Electric Fence Installation (construction)

Image Credit: Albert Bridge
In Part I of this article series I discussed how to plan your electric fence installation. I explained how to lay out your electric fence grid in a series of permanent electric fence corridors that will subsequently be divided by portable electric fence subdivisions. These portable electric cross-fences are discussed in the next article - Part III of this Smart Electric Fence Grid series.
On this page I will explain some of the key electric fence construction tips to remember when building your permanent electric fence grid.
Permanent Electric Fence Construction Tips:
Before discussing the individual components of your electric fence installation, it is worthwhile to do a quick review of the basic principles of how an electric fence system works.
An electric fence is an incomplete electrical circuit. The electric fence charger sends pulses of electrons down the electric fence wires but wire insulators prevent the electric charge from reaching the ground.
The electric fence circuit is only completed when something (cattle, humans, or vegetation) touches the wire, thus allowing the pulse of electrons in the high tensile wire to travel through the body down into the soil.
Ground rods connected to the electric fence charger simultaneously draw electrons back up out of the soil, thus completing the electrical circuit, as shown in the image below.

Your electric fence installation is an incomplete electrical circuit. But when cattle touch the wire, electrons in the wire are able to escape to the soil. The earth-ground system draws electrons back up from the soil to replace the electrons lost from the high tensile wire, thus completing the electrical circuit.
The Earth-Ground System
80% of all electric cattle fencing problems are caused by poor grounding.
When cattle touch your electric fence installation, they will only receive a shock if the earth-ground system is capable of instantly replacing all the electrons that escape to the soil from the fence. If the earth ground system is incapable of instantly collecting a huge number of electrons from the soil, the full charge on the fence will not be released when the cattle touch the wire. So, creating an effective earth-ground system is about building an effective electron collection system.
- A permanent electric fencing grid requires a minimum of 3 ground rods. More is better.
- You need a minimum of 1 ground rod for every 2-Joules of power output from your electric fence charger.
- Each ground rod should be at least 6 feet long.
- Only use galvanized steel ground rods. Copper ground rods will react with your galvanized steel wire, causing electrolysis, which will corrode the contact between the wire and the ground rods. Un-galvanized steel rods (i.e. re-bar) will rust. Rust is a very poor electrical conductor, thus preventing your ground rods from being able to gather electrons from the soil.
- Ground rods should be spaced at least 10 feet apart.
- The most effective ground rod layout is the crow's foot pattern. An image and full discussion of this ground rod pattern is found on page 70 of my book, Grass-Fed Cattle: how to produce and market natural beef.
- Ground rods need good contact with the soil to work effectively. If the moisture level in the soil is too low (i.e. during a dry year or in extremely sandy soil), your ground rods will begin losing their ability to pull electrons up from the soil. Ensure that your ground rods are placed in a moist area, or water the area around your ground rods during dry weather. If you have very dry sandy soils, drill large holes in the soil that you can fill with packed clay, then embed your ground rods in the clay.
- Use heavy duty leadout cable (insulated / coated wire) and good quality connector clamps to connect ground rods to the electric fence energizer.
- Do not install ground rods near water lines or milking sheds to avoid inducing an electrical charge in water lines or milking equipment.
To learn how to set up your earth ground system for winter, jump ahead to the article about electric fencing in winter in Part VII of this Smart Electric Fence Grid series.
Electric Fence Energizer
Another common problem in many electric fence installations is an undersized electric fence charger. Your charger needs to be able to push electrons through the full length of your electric fence installation, plus have enough power to overcome the drain of vegetation growing up and shorting out the wire.
- The power of your electric fence charger is measured in Joules. Your electric fence energizer output should be at least 1 Joule per 6 miles of wire. (Each strand of a multi-wire fence must be added up separately... wire distance on a multi-strand boundary fence adds up very fast!
- Use a minimum 10-Joule electric fence charger for your permanent electric fence grid. A minimum of 10 Joules is required to 'burn off' grass as it comes in contact with the fence. The ability to 'burn-off' grass is extremely important for keeping wires free of vegetation to so you can maintain full power along the entire length of fence.
How much power do you need on your electric fences?
To contain cattle, you need to maintain at least 3500 volts along the entire length of your electric fence lines - including the portable electric cross fences that you use to subdivide your permanent electric fence corridors. While electric fence charger selection is important to ensure that you have sufficient power on your fences, getting sufficient voltage to the far ends of your fences also depends on the thickness and electrical conductivity of the wires you use to build your fences, the quality of all electrical connections and wire knots, the quality of your insulators, and how free you keep your electric fences of vegetation and other debris that causes the wire to short out. Each of these components will be discussed in further detail below...
Trouble-shooting your electric fences

Get a good quality electric fence fault finder + volt meter + current meter. Many electric fence suppliers sell units that measure all three in a single unit, which makes it much simpler to measure not only if the fence is on or off, but also whether there is sufficient power on the fence line, and which direction you need to go to find any likely faults on the fence.
Posts
Posts can be spaced 60 to 100 feet apart, depending on your topography. Spacing between posts is simply a matter of maintaining a reasonably consistent wire height along your fence line, discussed below.
Always use a rot-resistant post, such as a treated post or a post made of wood that is naturally rot-resistant, such a eucalyptus wood. Untreated wood posts will rot and fall over in as little as 6 to 8 years. The lifespan of your electric fence installation (high tensile wire, insulators, etc) is as much as 40 years because your electric fences only function as a psychological, rather than as a physical barrier, and consequently do not experience the wear and tear of other types of cattle fencing. Make sure you use posts that will have a lifespan that matches the expected lifespan of the rest of the components of your electric fencing system. Treated fence posts in an electric fencing grid can be expected to last for 24-40 years in most climates.
Be aware that many of the chemicals used to treat conventional fence posts are not allowed by many organic certification regulations. Always check with your organic certifying body before building your fences so you are not forced to tear down and rebuild your fences. When in doubt, request the Material Safety Data Sheet for the fence post treatment chemical from the fence post supplier so you can get your organic certifying body to sign off on your fence posts (IN WRITING) before starting construction on your electric fence installation.
Recommended wire for permanent electric fences
Always use at least 12.5-gauge high tensile wire for your permanent electric fence installation. Thinner wires have a higher electrical resistance (similar to how water pressure decreases over long distances because of friction losses inside of small-diameter pipes). You will lose power much quicker as you get further from your energizer if you use thinner wires.
Do not use portable electric wire or poly-tape for your permanent electric fence corridors - they cannot carry power over long distances and will not last many years.
Regular galvanized 12.5-gauge high tensile wire is more than adequate for most farms, however, extremely large electric fence installations that span over several tens of miles may opt to use a much more expensive aluminum wire, which has 4x higher electrical conductivity than galvanized steel wire.
Wire tension and height

The electric fence wire does not need to be stretched singing-tight like a barbed wire fence since the wire functions as a psychological barrier, not a physical one. It simply needs to hang approximately 30 to 34 inches from the ground so that your adult cattle can neither step over nor crawl under the wire. The wire tension only needs to be sufficient to prevent the wire from sagging excessively. More tension is NOT better. More tension simply increases the chance that brace posts get pulled out of the ground and increases the chance that wires will break if cattle or wildlife run into them.
Install at least one permanent fence tightener, shown in the image on the right, on every single stretch of electric fence so you can adjust wire tension and take up extra slack if your electric fences sag or are stretched by cattle or wildlife running into the wire.
Reminder
Just because the 12.5-gauge galvanized electric fence wire is called 'high tensile wire' does not mean you are building a high-tension fence.
When electric fence wires hang 30 to 36 from the ground, they are high enough to allow newborn calves to freely walk under the wire. That's a good thing because it ensures that newborns can easily catch up with the herd if they accidentally wind up on the wrong side of a fence during a pasture move. The newborns won't go far because they are 'bound' to the herd and their mothers for security and milk. The only fences that need to act as a physical barrier to stop newborns walking underneath are your farm boundary fences (3 or more strands) to ensure that calves don't wind up on highways or in your neighbors freshly planted wheat field.
As calves grow larger and more independent, they will start to 'make contact' with the wire and will naturally stop sneaking outside the day's pasture slice.
Number of Wires
Since your electric fence installation functions as a psychological barrier, not as a physical barrier, once your cattle are trained, you only need single-wire electric fences to contain your cattle. Single-wire electric fences also make it easy for cattle to graze underneath the electric fence to keep vegetation in check. And finally, single-wire electric fences make it easy to create temporary gates anywhere you need them, which is not possible when you build electric fences with multiple wires.
There are three exceptions to this rule:
- Farm boundary fences need a minimum of 3 strands to function as a rudimentary physical barrier if you have a power outage.
- Electric fences dividing the bulls' grazing rotation from areas where the cow herd grazes should be at least 2-strand. Even with a 2-strand electric fence, your bull herd should never be allowed to graze directly adjacent to your cow herd or the bulls WILL jump over or break through the fence. However, this fact about bull behaviour is equally true of even the most hard-core barb wire or wire-mesh fence. Bulls and cows should never share a fence.
- Electric fence weaning should always be done across a 2-strand or 3-strand electric fence. Electric fence weaning is an important strategy that will greatly reduce stress and illness around weaning - you can learn more about electric fence weaning on pages 51 to 53 of my book, Grass-Fed Cattle: how to produce and market natural beef.
Never mix barbed wire with electric fencing
Never electrify barb wire. And never add electric fence wires to a barbed wire fence.
When cattle or wildlife (or humans!) touch an electric wire, they flinch. Hard. Getting caught up on a barbed wire while flinching from a 'zap' from an electric fence could cause dangerous tears to the body that may even be life threatening.
While electric fence shocks are generally safe on their own, getting tangled in barb wire while getting shocked repeatedly can cause potentially life-threatening burns. Furthermore, the pain of the repeated shocks can cause a victim to panic and get hopelessly tangled in the barb wires while tearing themselves to shreds. There are more than a few deer that have been tangled in barbed wire and died after tearing themselves to the bone while trying to escape an electrified wire that was installed alongside a barbed wire fence.
In short, never ever combine barb wire with electric cattle fencing.
Brace Posts

Every line of electric fencing needs to be supported by tying off to a brace post at both ends of the fence line. However, the traditional H-braces used for barbed wire cattle fencing are overkill for most electric fences because you are not building a high-tension fence. Use Angle Braces for multi-strand boundary fences and the even simpler Bedlog Brace on single-wire electric fences. You will find images and descriptions of how to build angle braces and bedlog braces on page 74 of my book, Grass-Fed Cattle: how to produce and market natural beef.
Insulators
Insulator quality matters. Cheap post insulators will eventually allow some of the power on the fence line to bleed off the electric fence wires into the posts, causing electrical shorts and draining away valuable power.
Cheap strain insulators (used for tying off to a post) are soft and easily deformed if cattle or wildlife run into the wire. Even the persistent tension of the wire straining against the insulator can cause cheap strain insulators to deform and fail. A deformed or damaged strain insulator will easily allow the wire to cut through the plastic until the hot wire is able to touch the dead wire used to tie off to the post, thus causing a short that is very difficult to find because the fence line is not broken and the short is invisible because it is hidden inside the damaged strain insulator.
Insulator quality also affects how quickly the plastic insulators age. Cheap plastic becomes brittle with prolonged exposure to sunlight so that the insulator may break easily if cattle or wildlife run into the wires. When you're building a fence that you expect to last for the next 3 to 4 decades, don't try to save a few pennies by going with cheap insulators. And make sure you purchase insulators are UV resistant.
The insulator should always allow the wire to move freely through the insulator - it should never grip the wire! Some insulator styles are compressed if you pound nails too far into the post. Any restriction in wire movement will increase the chance that the wire breaks if cattle or wildlife run into the wire.
There are two main types of insulator on the market - those that permanently hold the wire (unless the entire insulator is removed from the post) and those that allow you to release the wire with the flick of a tab (swivel-lock insulators) or the pull of a pin (pin-lock insulators). Permanent insulators are fine for any multi-strand electric fence installation, but single wire fences are best constructed using swivel-lock insulators that you can easily open so you can lift the wire to create temporary gates. Pin-lock insulators are not ideal for creating temporary gates because they are difficult to open while the wire is 'hot' and they break easily. Swivel-lock insulators, by contrast, are much more robust and are easy to open even if the wire is hot. Follow the link to learn more about swivel-lock insulators and temporary gates.
Permanent Gates
Pre-plan your permanent gate locations on your farm map so that traffic flow through gates is not impeded by sharp corners or poor visibility. Always consider traffic flow - in both directions - so that it is easy to get animals back to the corral regardless of where they are in the pasture rotation.
Gates are best located in corners, not in the middle of a fence line so that cattle can't miss the gate and run alongside the herd, but on the wrong side of the fence.
Gates should be WIDE to prevent traffic jams.
Gates in your electric fence installation should be located so it is easy to see whether the gate is open or closed while still out on pasture.
Cattle vision is primarily 2-D, like when you hold one eye closed, so make sure that there is no distraction (like a parallel fence) immediately behind the gate that could be confused for a closed gate from your cattle's 2-dimensional point of view. When cattle baulk at a gate it is often because their vision is unable to discern whether the gate is open or closed.
Every gate in your electric fence installation should have insulated wire buried underneath the gate (called undergate leadout cable) to power the wire on the far side of the gate. Gates should only be powered from one side so that the gate is not 'hot' when it is opened. This ensures that the gate does not short out against the grass when it is opened. A snapping sound caused by an open gate shorting against the grass will cause your cattle to baulk when going through the gate.
Undergate leadout cable should be further protected by burying it INSIDE a section of rubber garden hose cut to fit the entire length of the gate. The garden hose helps protect the leadout cable from gnawing rodents and sharp rocks. The garden hose also reduces the risk of kinks and bends that could damage the insulated coating on the leadout cable, which would lead to electrical shorts.
Gate handles should have a metal hook so the gate is powered from the handle side, not the far end tied off to the post. This ensures that the gate instantly loses all power when you open it.
Gate Construction Tip
Although screw-in ring insulators are designed as regular in-line wire insulators for wooden posts, I like using them as the wire tie-off on one side of gates in electric fence installations, opposite of the gate handle.
Screw-in ring insulators allow you to completely remove the gate when not in use simply by sliding the wire loop out of the insulator when the gate is open. This prevents cattle, horses, or ATV's from getting tangled in open gates lying on the ground.

Screw-in insulators will break before gate handles break, which is a good thing. Because screw-in ring insulators are cheap and easy to replace, they create an intentional weak point in a gate that prevents damage to gate handles and posts if cattle or ATV's run through a closed gate.
In-line fence springs and temporary gates
During electric fence installation, it is worthwhile installing springs (sold by some electric fence suppliers) within your permanent electric fence lines to provide a little extra give to prevent breakage when wildlife or cattle run into a wire. These springs also provide a little extra give so you can lift wires over your head (with insulated gloves) allowing you to drive ATV's under your wires instead of bothering to build gates everywhere in your electric fence installation.
Wire Connections, Joints, and Knots
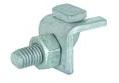 L-shaped Joint Clamp from Gallagher Animal Management Systems
In order to effectively push power to the far ends of your entire electric fence installation, you need to ensure maximum contact within all your wire joins and connections. A poorly-constructed knot or wire join with only a single point of contact is like putting a thin section of garden hose midway within a long a water pipe. The narrow point of contact creates high electrical resistivity, restricting how much power can push past the join.
Always use connector clamps (joint clamps), like the L-shaped joint clamp shown on the right, to reinforce the electrical contact of all wire joins or connections in your electric fence installation, including connections between two fence lines and both ends of the underwire leadout cable used to run wire underneath gates.
When repairing wire breaks in your electric fence installation, always use knots that have multiple points of contact, and reinforce the knots with a joint clamp. Knots that use two looped wire ends (with only a single point of contact) will cause electrical shorts and severely restrict electrical conductivity. Instead, learn how to tie the figure eight knot or the reef knot for repairing wire breaks.
Tying wire knots

)
Learn how to tie wire knots by hand. It will greatly increase the speed of your electric fence installation and will reduce the costs of your electric fence supplies. You can learn more about how to tie wire knots by hand (without special tools) on page 72 and 73 of my book, Grass-Fed Cattle.
One of the most useful skills when working with 12.5-gauge high tensile wire is to learn how to tie wire knots by hand. It is much simpler and faster than using crimping tools and will significantly cut down the time and expense of electric fence installation. Tie-offs (such as the post tie-off shown in the image above), wire knots (like the figure-eight knot and the reef knot), splices, strain insulators, and even wire cutting (wire breaking) are all easily done by hand, without tools, and is significantly easier and faster than using tools.
Take a wire-tying course from your local electric fence dealer or refer to the wire-tying instructions on page 72 and 73 of my book, Grass-Fed Cattle. Tying wire knots is a very easy skill to learn. You'll be amazed at how high tensile wire turns to putty in your hands once you master this simple skill.
Cut-Out Switches
Every electric fence corridor should be placed on its own cut-out switch so you can isolate individual fence lines for repair in your electric fence installation without turning off the entire grid. This also allows you to concentrate power only in areas where you need it during the winter electric fencing season. However, remember that except for maintenance and repair situations, all sections of your electric fence installation should remain ON during the growing season so your fences can burn off vegetation that grows up underneath the wires.
Lightning Diverters
And finally, make sure you install lightning diverters in your electric fence installation to protect your electric fence charger during lightning strikes. Smaller grids can connect a single lightning diverter directly to the earth-ground system, allowing lightning strikes to bypass the electric fence energizer during a lightning strike. Extremely large electric fence grids should install additional lightning diverters and ground rods further out along their electric fence installation.
Where to find additional instructions, diagrams, and a wide range of electric fence construction tips...
The "Electric Fences and Rotational Grazing" chapter of my book, Grass-Fed Cattle, provides detailed instructions and diagrams for every stage of electric fence construction, including complete instructions for gates, underground wires, brace posts (strainer posts), insulators, energizers, ground rods, lightning protectors, cut-out switches, troubleshooting, and much, much more.
Related Articles:From the Smart Electric Fence Grid series:
Other articles:
(Disclosure: I get commissions for purchases made using Amazon links in my post.) And when you're ready to start planning your cattle farm, check out my book: Grass-Fed Cattle: How to Produce and Market Natural Beef. Use the links below to explore my book and read reviews on Amazon: 
|
|
Share: |
|

(I get commissions for purchases made using Amazon links in my post.)
My book is available in the US:
- Amazon#CommissionsEarned
- Barnes & Noble
- Indiebound
- Google Play
In Canada:
- Amazon#CommissionsEarned
- Chapters Indigo
And in the UK:
- Amazon#CommissionsEarned
- Waterstones
Affiliate products.
In my articles I recommend some of my favorite cattle farming books and products. If you buy something through one of those links, I receive a small commission. There is no additional cost to you. To learn more, please see my affiliate disclosure document.